Once you get your hands on the XAPIZ3500, you need to set up your PI in order to create cool stuff. Setting up the PI from scratch can take hours, so we provide an image you can download and start playing within minutes. For those who wish to build their customized image from scratch, we provide the step by step instructions below.
Downloading Image
Disclaimer: This image is meant to get you started quickly, if you need to deploy your project, please make sure you know what you are doing. This is built is not meant for production use.
Warning: Use a new SDCard, the content in the card will be erased and CANNOT be recovered.
Download the image :
Version 0.0.2
Flash it to a new SDCard using your favorite tool. We use balenaEtcher.
username : pi
password : raspberry
Change them immediately!! Use the following command and follow the instructions.
$ passwdLet’s Have Some Fun
First, let’s flash the model and firmware on the board.
$ cd xalogic/xapiz3500_demo
$ kflash -p /dev/ttyS0 -B xapiz model/xapiz3500_yolo_20_demo.kfpkg -b 1152000 -t
Next, let try out the image demo. You should be able to see the following image.
$ cd pi/src_py
$ python3 image_demo.py
Next, let’s try a video demo You should see the following video.
$ python3 video_demo.pyYou could try out your own images/videos by placing them in xapiz3500_demo/data and run the following command.
$ python3 image_demo.py --imgsrc data/myimage.jpg
$ python3 image_demo.py --vidsrc data/myvideo.mp4
Build From Scratch
These steps are tested on Raspian (2018-11-13-raspbian-stretch-full), it should work with a newer image but we did not have the change to test it.
There are issues reported with Jessie. Please do not use that.
Preparing the PI
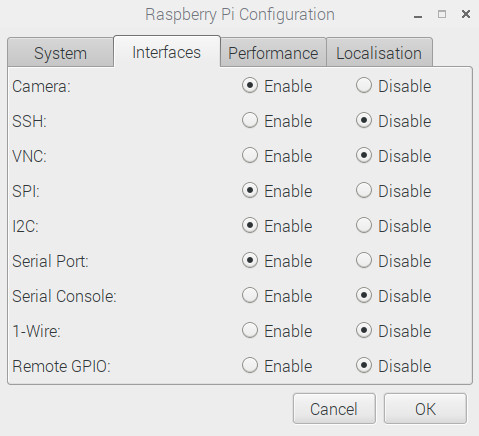
Run the Raspberry PI Config tool and select the following settings.
Preferences -> Raspberry Pi Configuration
It is important that “Serial console” is disabled as it interferes with our UART port.
You will need to reboot after this step.
Installing OpenCV
This is the longest step in the whole process and you should allocate plenty of time or schedule a coffee break while compiling.
I followed this fantastic site to install OpenCV and make a small change by updating the OpenCV version to a newer one. For more detailed explanation, please visit this following page. I consolidated the step below if you just want to go through it.
https://www.pyimagesearch.com/2017/09/04/raspbian-stretch-install-opencv-3-python-on-your-raspberry-pi
$ sudo apt-get install build-essential cmake pkg-config
$ sudo apt-get install libjpeg-dev libtiff5-dev libjasper-dev libpng12-dev
$ sudo apt-get install libavcodec-dev libavformat-dev libswscale-dev libv4l-dev
$ sudo apt-get install libxvidcore-dev libx264-dev
$ sudo apt-get install libgtk2.0-dev libgtk-3-dev
$ sudo apt-get install libatlas-base-dev gfortran
$ sudo apt-get install python2.7-dev python3-dev

$ cd ~
$ mkdir opencv
$ cd opencv
$ wget -O opencv_contrib.zip https://github.com/opencv/opencv_contrib/archive/3.4.6.zip
$ unzip opencv_contrib.zip
$ wget -O opencv_contrib.zip https://github.com/opencv/opencv_contrib/archive/3.4.6.zip
$ unzip opencv_contrib.zip

$ cd ~/opencv-3.4.6/
$ mkdir build
$ cd build
$ cmake -D CMAKE_BUILD_TYPE=RELEASE \
    -D CMAKE_INSTALL_PREFIX=/usr/local \
    -D INSTALL_PYTHON_EXAMPLES=ON \
    -D OPENCV_EXTRA_MODULES_PATH=~/opencv/opencv_contrib-3.4.6/modules \
    -D BUILD_EXAMPLES=ON ..
At this point check the output of cmake and ensure there are no errors.
Before we compile, we need to increase the default swap space. Skip this if you have already done it in your system.
Open your /etc/dphys-swapfile and then edit the CONF_SWAPSIZE variable:
# set size to absolute value, leaving empty (default) then uses computed value
#   you most likely don't want this, unless you have an special disk situation
# CONF_SWAPSIZE=100
CONF_SWAPSIZE=1024
$ sudo /etc/init.d/dphys-swapfile stop
$ sudo /etc/init.d/dphys-swapfile startFinally, we can compile
#The following step will take a long time, see that it runs and get yourself a cup of coffee.
$ make -j4
There is an issue that I encounted where the compile is stuck at 99% for a really long time. After some searching on the web, the solution is to kill it using Ctrl-C and then re-run with the following command. It won’t recompile all, just whatever is left. Something to do with multi-task and swap.
https://www.raspberrypi.org/forums/viewtopic.php?t=191188
$make -j1Final steps to installation….
$ sudo make install
$ sudo ldconfig
It was recommended that we change the swap space back to 100 or whatever you have been using as sdcard have limits on the number of writes. So we don’t want too much swap space.
# set size to absolute value, leaving empty (default) then uses computed value
#   you most likely don't want this, unless you have an special disk situation
CONF_SWAPSIZE=100
# CONF_SWAPSIZE=1024
$ sudo /etc/init.d/dphys-swapfile stop
$ sudo /etc/init.d/dphys-swapfile startDependencies
To get SPI running, we need to install the drivers
We created a modified version of py-spidev to optimize the performance for XAPIZ3500

cd ~
$ mkdir xaspidev
$ cd xaspidev/
$ git clone https://github.com/xalogic-open/py-spidev
$ cd py-spidev/
$ sudo make all PYTHON=python3
$ sudo make install PYTHON=python3
XaLogic Software
This step will clone the necessary database to get your demo up and running.
$ cd ~
$ mkdir xalogic
$ cd xalogic
$ git clone https://github.com/xalogic-open/kflash.py.git
$ cd kflash.py/
$ sudo python3 setup.py install
$ cd ~/xalogic
$ git clone https://github.com/xalogic-open/xapiz3500_demo.git
Once you are done, you are ready to play!!! Following the steps listed above and have fun!!!
$ cd xalogic/xapiz3500_demo
$ kflash -p /dev/ttyS0 -B xapiz model/xapiz3500_yolo_20_demo.kfpkg -b 1152000 -t

$ cd pi/src_py
$ python3 image_demo.py
$ python3 video_demo.py