K210 Blinky
So you want to develop your own C code on the K210, you can do it all on the Raspberry PI without any external programmer or debuggers. Follow through this tutorial to find out how you can easily do that.
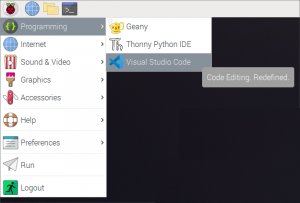
Install VS Code
Installing VS Code on the Raspberry PI using the following command.
sudo apt update
sudo apt install code
Once installed you can start the VS Code from the menu.
Install Platform IO Plugin
The Platform IO is a plugin for VS Code and is the IDE we will be using to develop our C code for K210. Follow the steps below to install the plugin.

- Click on the Plugin icons and you will be presented with a list of plugins to install
- Type "platformio" in the search area and you will see the Platorm IO IDE plugin.
- Click on install. It will take a couple of minutes and you will be asked to restart VS Code.
Install XaLogic Platform
To simplify configuration of the project, we had prepared a custom platform so you can get all the necessary tools and SDK needed to develop the code in C. You only need to do this once and the next time you create a new project, all the tools and packages will be available.
The follow steps will help you get familiarize with the Platform IO and install the custom platform.
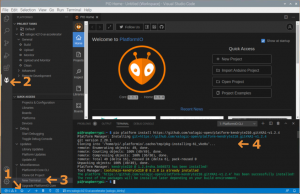
- Click on this "Home" icon to show the Platform IO Home page. On the home page you will be able to create new projects etc.
- Click on this Platform IO Plugin icon and you will be presented with the command panel where you can build, upload binary to the board and open up a terminal.
- Click on the "New Terminal" link and you will be presented with a PIO terminal.
- Finally at the terminal execute the following command to install all the necessary packages.
pio platform install https://github.com/xalogic-open/platform-kendryte210.git#XA1-v1.2.4
Create Project
Now we can finally create our project. We will create a simple Hello World project to blink an LED.
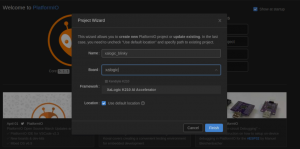
- Click on "Create Project" in the Platform IO Home and you will be presented this pop up window.
- Enter a project name and type "xalogic" in the Board selection and you will see the "XaLogic K210 AI Accelerator" board. Click on it.
- You can keep the "Use default location". Mouse over the ? icon and you will see the default location.
- Click Finish and your project will be created.
Create Source code

- Click on the file Navigation Icon.
- Right click on the "src" folder of the project you just created.
- Select new file
In the new file, you copy and paste the following code which will blink an LED on the board.
Build and Upload

- Click on the Platform IO Plugin icon
- You can either build first or you could simply click on upload which will automatically do a build if necessary.
- Once completed you will see the "success" status in the terminal.
If all goes well this is what you will see on the board.